gulp学习笔记

gulp是什么

我们来看官网给出的解释:

Automate and enhance your workflow

翻译过来就是:用自动化构建工具增强你的工作流程!

gulp是前端开发过程中对代码进行构建的工具,是自动化项目的构建利器;它不仅能对网站资源进行优化,而且在开发过程中很多重复的任务能够使用正确的工具自动完成;使用它,我们不仅可以很愉快的编写代码,而且大大提高我们的工作效率。

gulp能用来做什么

  • 搭建web服务器
  • 使用预处理器Sass,Less
  • 压缩优化,可以压缩HTML、css、JavaScript、 图片
  • 自动将更新变化的代码实时显示在浏览器
  • 前端测试
  • ……

gulp有极丰富的插件来帮助我们实现各种功能

gulp插件地址:http://gulpjs.com/plugins

安装gulp

前提假设我们已经安装了node,并且对npm也了解

全局安装gulp

全局安装gulp目的是为了通过它执行gulp任务

1
$ npm install gulp -g

查看是否正确安装,我们在终端输入gulp -v

1
2
3
$ gulp -v
[10:26:05] CLI version 3.9.1
[10:26:05] Local version 3.9.1

出现版本号,说明正确安装

新建package.json文件

首先我们先新建一个项目文件夹

1
$ mkdir Gulp

然后进入项目文件夹

1
$ cd Gulp

创建一个package.json

1
$ npm init -y

在项目目录里局部安装gulp

1
$ npm install gulp --save-dev

创建gulpfile.js

在根目录下面创建gulpfile.js文件,此文件为配置文件

自定义任务

gulpfile.js

1
2
3
4
5
6
const gulp = require("gulp");
//定义一个任务
gulp.task("hello",()=>{
console.log("Hello World");
})

然后在命令行执行gulp任务

1
2
3
4
5
$ gulp hello
[11:51:14] Using gulpfile ~/WebstormProjects/Gulp/gulpfile.js
[11:51:14] Starting 'hello'...
Hello World
[11:51:14] Finished 'hello' after 392 μs

我们会看到打印出了”Hello World”

默认任务

gulpfile.js

1
2
3
4
5
6
7
const gulp = require("gulp");
gulp.task("hello",()=>{
console.log("Hello World")
});
//第一个参数是"default",第二个参数是一个数组,里面存放的是自定义任务名
gulp.task("default",["hello"]);

这样我们就可以直接gulp

1
2
3
4
5
6
7
$ gulp
[12:21:34] Using gulpfile ~/WebstormProjects/Gulp/gulpfile.js
[12:21:34] Starting 'hello'...
Hello World
[12:21:34] Finished 'hello' after 171 μs
[12:21:34] Starting 'default'...
[12:21:34] Finished 'default' after 43 μs

Basic

读取想要处理的文件,然后把处理好的文件放到指定的地方

gulp.src()

gulp.src()方法可以帮我们找到想要处理的文件

.pipe()

然后通过.pipe()来处理这些找出来的文件,pipe就是一个管道,每一个管道里面我们都可以指定它的功能来处理这个文件

.pipe(gulp.dest())

最后我们再使用.pipe(gulp.dest())方法,去把处理好的文件放到指定的地方。

dest is short for destination(目的地,目标位置)

Copy

目录结构

1
2
|--index.html
|--gulpfile.js

gulpfile.js

1
2
3
4
5
6
const gulp = require("gulp");
gulp.task("copy",()=>{
return gulp.src("index.html") //注意:这里写"./index.html"和"index.html"效果一样
.pipe(gulp.dest("dist"))
});

然后在命令行执行gulp copy

1
2
3
4
$ gulp copy
[12:42:06] Using gulpfile ~/WebstormProjects/Gulp/gulpfile.js
[12:42:06] Starting 'copy'...
[12:42:06] Finished 'copy' after 16 ms

然后目录结构就变了

1
2
3
4
|--dist
|--index.html
|--index.html
|--gulpfile.js

glob

目录结构

1
2
3
4
5
6
7
8
9
10
11
12
|--dist
|--index.html
|--images
|--icon
|--01.png
|--02.png
|--03.png
|--01.jpg
|--02.jpg
|--03.png
|--index.html
|--gulpfile.js

下面我们要做的就是把jpg图片复制到dist目录下的images文件夹里

gulpfile.js

1
2
3
4
5
6
const gulp = require("gulp");
gulp.task("images",()=>{
return gulp.src("images/*.jpg") //只匹配images目录下的jpg文件
.pipe(gulp.dest("dist/images"))
});

执行gulp images

1
2
3
4
$ gulp images
[13:07:12] Using gulpfile ~/WebstormProjects/Gulp/gulpfile.js
[13:07:12] Starting 'images'...
[13:07:12] Finished 'images' after 39 ms

然后我们观察目录结构变化

1
2
3
4
5
6
7
8
9
10
11
12
13
14
15
|--dist
|--index.html
|--images
|--01.jpg
|--02.jpg
|--images
|--icon
|--01.png
|--02.png
|--03.png
|--01.jpg
|--02.jpg
|--03.png
|--index.html
|--gulpfile.js

那么怎么才能把png和jpg都复制过来呢?

gulpfile.js

1
2
3
4
5
6
7
const gulp = require("gulp");
gulp.task("images",()=>{
- return gulp.src("images/*.jpg") //只匹配images目录下的jpg文件
+ return gulp.src("images/*.{jpg,png}") //匹配image目录下的jpg和png文件
.pipe(gulp.dest("dist/images"))
});

执行gulp images后,dist文件夹目录结构如下

1
2
3
4
5
6
|--dist
|--index.html
|--images
|--01.jpg
|--02.jpg
|--03.png

我们再来看,修改一下

1
2
3
4
5
6
7
8
9
10
gulpfile.js里面匹配是*.*
gulp.src("images/*.*")
那么dist目录结构
|--dist
|--index.html
|--images
|--01.jpg
|--02.jpg
|--03.png
1
2
3
4
5
6
7
8
9
10
11
gulpfile.js里面匹配是*
gulp.src("images/*")
那么dist目录结构
|--dist
|--index.html
|--images
|--icon
|--01.jpg
|--02.jpg
|--03.png

如果想要深层次匹配

1
2
3
4
5
6
7
8
9
10
11
12
13
14
gulpfile.js里面匹配是**/*
gulp.src("images/**/*")
那么dist目录结构
|--dist
|--index.html
|--images
|--icon
|--01.png
|--02.png
|--03.png
|--01.jpg
|--02.jpg
|--03.png

怎么样,images里的文件全都匹配过来了

多个glob

目录结构

1
2
3
4
5
6
7
8
|--dist
|--index.html
|--json
|--01.json
|--xml
|--01.xml
index.html
gulpfile.js

gulpfile.js

1
2
3
4
5
6
const gulp = require("gulp");
gulp.task("data",()=>{
return gulp.src(["json/*.json","xml/*.xml"]) //用数组的形式匹配多个glob
.pipe(gulp.dest("dist/data"))
});

执行gulp data

dist的目录结构变为

1
2
3
4
5
|--dist
|--index.html
|--data
|--01.json
|--01.xml

negate

不想包含的文件用!排除

例如json文件夹里

1
2
3
|--json
|--01.json
|--negate-01.json

我们不想要negate开头的json文件

gulpfile.js

1
2
3
4
5
6
const gulp = require("gulp");
gulp.task("data",()=>{
return gulp.src(["json/*.json","xml/*.xml","!json/negate-*.json"]) //再多加一个排除的glob,注意前面用!号
.pipe(gulp.dest("dist/data"))
});

执行完过后,就不会复制negate-01.json这个文件了

任务依赖

如果一个任务的建立是依赖于其他任务,就需要用到以下的写法

gulpfile.js

1
2
3
4
5
6
7
8
9
10
11
12
13
14
15
16
17
18
19
20
const gulp = require("gulp");
//复制index.html
gulp.task("copy",()=>{
return gulp.src("index.html")
.pipe(gulp.dest("dist"))
});
//复制图片
gulp.task("images",()=>{
return gulp.src("images/**/*")
.pipe(gulp.dest("dist/images"))
});
//复制数据
gulp.task("data",()=>{
return gulp.src(["json/*.json","xml/*.xml"])
.pipe(gulp.dest("dist/data"))
});
//build任务是依赖于前三个任务的,那么我们第二个参数,传入数组,数组里存放的是它所依赖的任务名
gulp.task("build",["copy","images","data"],()=>{
console.log("编译完成");
})

然后执行gulp build

1
2
3
4
5
6
7
8
9
10
11
$ gulp build
[13:48:20] Using gulpfile ~/WebstormProjects/Gulp/gulpfile.js
[13:48:20] Starting 'copy'...
[13:48:20] Starting 'images'...
[13:48:20] Starting 'data'...
[13:48:20] Finished 'copy' after 53 ms
[13:48:20] Finished 'data' after 43 ms
[13:48:20] Finished 'images' after 52 ms
[13:48:20] Starting 'build'...
编译完成
[13:48:20] Finished 'build' after 154 μs

我们可以看出,copy,images和data三个任务是同时进行的,然后再执行build任务

watch

用gulp.watch()方法可以监视文件的变化

gulpfile.js

1
2
3
4
5
6
7
8
9
10
11
12
13
14
15
16
17
18
19
20
21
22
23
24
25
const gulp = require("gulp");
//复制index.html
gulp.task("copy",()=>{
return gulp.src("index.html")
.pipe(gulp.dest("dist"))
});
//复制图片
gulp.task("images",()=>{
return gulp.src("images/**/*")
.pipe(gulp.dest("dist/images"))
});
//复制数据
gulp.task("data",()=>{
return gulp.src(["json/*.json","xml/*.xml"])
.pipe(gulp.dest("dist/data"))
});
//监视文件
gulp.task("watch",()=>{
//当index.html文件变化时,就执行copy任务
gulp.watch("index.html",["copy"]);
//当图片变化时,就执行images任务
gulp.watch("images/**/*.{png,jpg}",["images"]);
//当数据发生变化时,就执行data任务
gulp.watch(["json/*.json","xml/*.xml","!json/negate-*.json"],["data"]);
});

执行gulp watch就可以监视文件的变化

plugin

gulp提供了很好的接口,它本身并不会去做太多的事情,除了去可以读取文件,监视文件的变化,可以把文件放到指定的位置,我们可以插件来扩展gulp的功能,这些插件可以取执行特定的任务,比如说:

  • 编译Sass,编译Less
  • 合并文件
  • 压缩、混淆文件
  • 重命名
  • 优化图像的尺寸
  • 创建一个本地的开发服务器

gulp插件地址:[http://gulpjs.com/plugins

使用方法都类似

  1. 先找到所需的插件,然后npm install 插件名 --save-dev安装
  2. 然后在gulpfile.js中引入插件const minifycss = require("gulp-minify-css")
  3. 查看插件文档,看使用方法

gulp-sass

安装gulp-sass

1
$ npm install gulp-sass --save-dev

使用gulp-sass

在配置文件gulpfile.js中引入这个插件

1
2
3
4
5
6
7
8
const gulp = require("gulp");
const sass = require("gulp-sass");
gulp.task("sass",()=>{
return gulp.src("style/**/*.scss")
.pipe(sass())
.pipe(gulp.dest("dist/css"))
});

然后执行gulp sass

呃,我们遇到个错误

1
Node Sass does not yet support your current environment: OS X 64-bit with Unsupported runtime (57)

在Stack Overflow上查了一下,说让我们运行一下npm rebuild node-sass

于是我们执行npm rebuild node-sass

然后再执行gulp sass

还是不行,于是我们在https://github.com/sass/node-sass/releases/tag/v3.13.1里看到了
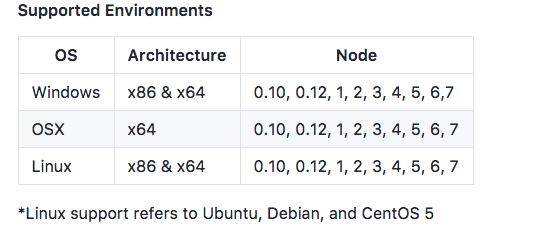
想起来我装的是node的最新版,输入node -v

1
2
$ node -v
v8.2.1

也罢,那就等着它支持到8.x了吧。

于是,我们假装成功了(不要脸.jpg)

然后我们就能看见在dist文件夹下有一个css文件夹,里面有style.css文件

gulp-less

安装gulp-less

1
$ npm install gulp-less --save-dev

使用gulp-less

在配置文件gulpfile.js中引入这个插件

1
2
3
4
5
6
7
8
const gulp = require("gulp");
const less = require("gulp-less");
gulp.task("less",()=>{
return gulp.src("style/**/*.less")
.pipe(less())
.pipe(gulp.dest("dist/css"))
});

然后执行gulp less

1
2
3
4
$ gulp less
[17:49:26] Using gulpfile ~/WebstormProjects/Gulp/gulpfile.js
[17:49:26] Starting 'less'...
[17:49:26] Finished 'less' after 72 ms

会在dist下面生成

1
2
3
|--dist
|--css
|--style.css

gulp-connect

安装gulp-connect

1
$ npm install gulp-connect --save-dev

使用gulp-connect

将gulp-connect模块导入

1
2
3
4
5
6
7
8
9
const gulp = require("gulp");
const connect = require("gulp-connect");
gulp.task("server",()=>{
connect.server({
//在这个配置对象里可以配置端口,根目录等相关信息
root:"dist"
})
});

然后执行gulp server,我们会看到如下信息

1
2
3
4
5
$ gulp server
[17:47:54] Using gulpfile ~/WebstormProjects/Gulp/gulpfile.js
[17:47:54] Starting 'server'...
[17:47:54] Finished 'server' after 51 ms
[17:47:54] Server started http://localhost:8080

告诉我们在http://localhost:8080就可以查看网页了

reload

当某些文件变化以后,能实时地刷新页面,这样就不用每次修改之后,再手动地刷新页面来查看变化。

打开gulpfile.js,找到创建服务器的任务,把livereload的值设置为true

1
2
3
4
5
6
7
8
9
10
11
12
13
14
15
16
17
18
19
20
21
22
23
24
25
26
27
28
29
30
31
32
33
34
35
const gulp = require("gulp");
const connect = require("gulp-connect");
gulp.task("copy",()=>{
return gulp.src("index.html")
.pipe(gulp.dest("dist"))
//2.文件复制过后执行reload方法
.pipe(connect.reload())
});
gulp.task("images",()=>{
return gulp.src("images/**/*")
.pipe(gulp.dest("dist/images"))
});
gulp.task("data",()=>{
return gulp.src(["json/*.json","xml/*.xml"])
.pipe(gulp.dest("dist/data"))
});
gulp.task("watch",()=>{
gulp.watch("index.html",["copy"]);
gulp.watch("images/**/*.{png,jpg}",["images"]);
gulp.watch(["json/*.json","xml/*.xml","!json/negate-*.json"],["data"]);
});
gulp.task("server",()=>{
connect.server({
root:"dist",
//1.将livereload设置为true
livereload: true
})
});
//3.设置默认任务,依赖于server和watch
gulp.task("default", ["server","watch"]);

执行顺序是

  1. index.html文件发生变化
  2. 触发watch任务
  3. watch任务又触发copy任务
  4. 将更改后的index.html拷贝到dist文件夹中
  5. reload

gulp-concat

使用gulp-concat这个插件我们可以使几个文件合并到一块儿

安装插件

1
$ npm install gulp-concat --save-dev

使用gulp-concat

1
2
3
4
5
6
7
8
9
const gulp = require("gulp");
//1.引入gulp-concat
const concat = require("gulp-concat");
gulp.task("scripts",()=>{
return gulp.src("javascript/**/*.js") //2.找到需要合并的js文件
.pipe(concat("index.js")) //3.通过pipe流入concat()方法,concat方法的参数是合并后的名字
.pipe(gulp.dest("dist/js")) //4.流入指定的文件夹
});

合并后的dist目录

1
2
3
|--dist
|--js
|--index.js

gulp-uglify

把几个js文件合并到一块儿,接下来我们可以再压缩混淆一下,完成这个动作我们可以使用gulp-uglify这个插件

安装插件

1
$ npm install gulp-uglify --save-dev

使用插件

1
2
3
4
5
6
7
8
9
10
11
12
const gulp = require("gulp");
const concat = require("gulp-concat");
//1.引入gulp-uglify
const uglify = require("gulp-uglify");
gulp.task("scripts",()=>{
return gulp.src("javascript/**/*.js")
.pipe(concat("index.js"))
//2.合并之后压缩混淆
.pipe(uglify())
.pipe(gulp.dest("dist/js"))
});

然后执行gulp scripts就可以压缩混淆了

注意:

若出现一下种错误,说明js代码有问题

1
2
3
4
events.js:182
throw er; // Unhandled 'error' event
^
GulpUglifyError: unable to minify JavaScript

rename

在把处理好的文件存储到指定的位置之前,我们可以重命名一下它,这里使用gulp-rename这个插件

安装插件

1
$ npm install gulp-rename --save-dev

使用插件

1
2
3
4
5
6
7
8
9
10
11
12
13
const gulp = require("gulp");
const concat = require("gulp-concat");
const uglify = require("gulp-uglify");
const rename = require("gulp-rename");
gulp.task("scripts",()=>{
return gulp.src("javascript/**/*.js")
.pipe(concat("index.js"))
.pipe(gulp.dest("dist/js"))
.pipe(uglify())
.pipe(rename("index.min.js"))
.pipe(gulp.dest("dist/js"))
});

这个就不一一解释了

gulp-minify-css

压缩css使用gulp-minify-css

安装插件

1
$ npm install gulp-minify-css --save-dev

使用插件

1
2
3
4
5
6
7
8
9
10
11
12
13
14
const gulp = require("gulp");
const less = require("gulp-less");
const connect = require("gulp-connect");
const concat = require("gulp-concat");
const uglify = require("gulp-uglify");
const rename = require("gulp-rename");
const minifycss = require("gulp-minify-css");
gulp.task("less",()=>{
return gulp.src("style/**/*.less")
.pipe(less())
.pipe(minifycss()) //如果愿意,在这里也可以压缩完重命名什么的
.pipe(gulp.dest("dist/css"))
});

执行gulp less就可以压缩css代码了

gulp-imagemin

gulp-imagemin可以帮我们优化图片的尺寸,在保证不改变图像质量的情况下可以让图像的体积变得更小一些,下面我们先去安装一下这个插件

安装插件

1
$ npm install gulp-imagemin --save-dev

使用插件

1
2
3
4
5
6
7
8
const gulp = require("gulp");
const imagemin = require("gulp-imagemin");
gulp.task("images",()=>{
return gulp.src("images/**/*")
.pipe(imagemin())
.pipe(gulp.dest("dist/images"))
});

然后执行gulp images就可以执行了。


本文结束,感谢阅读。

本文作者:melody0z
本文链接:https://melodyvoid/gulp/gulp-learning-notes.html
欢迎转载,转载请注明文本链接

坚持原创技术分享,您的支持将鼓励我继续创作!